Difference between revisions of "Meteobridge VM on PROXMOX"
(Created page with " First step is that you download the KVM/QEMU compatible disk image [https://admin.meteobridge.com/files/meteobridge-mbx86-v1.0-16G.img.gz here]. File is in "gzip" format and...") |
|||
| Line 1: | Line 1: | ||
| − | + | When there is a PROXMOX VE installed on your machine you can use the Meteoridbe VM raw image (used for KVM) to setup a Meteobridge VM within your PROXMOX VE. | |
| − | + | ||
| − | + | First setp is to create a new Meteobridge VM within your PROXMOX environment. | |
| − | * | + | * Direct your browser to the PROXMOX Web GUI and press "Create VM" button.<BR>[[File:pm1.png|top|800px]] |
| − | * | + | * Insert "Meteobridge" as the name of the new VM and notice the VM ID (here "100") as you will need this later on to generate a disk image for this specific VM. |
| − | + | * Goto "OS" tab and select "Do not use any media" and "Guest OS" type as "Other".<BR>[[File:pm2.png|top|400px]] [[File:pm3.png|top|400px]] | |
| − | + | * Goto "Memory" tab and insert 256 MB as memory size. This is good enough for Meteobridge and it will not benefit from more. | |
| − | + | * Settings on the other tabs can stay at default values. Goto "Confirm" tab to check that all settings are like in the example below. Then press "Finish".<BR>[[File:pm4.png|top|400px]] [[File:pm5.png|top|400px]] | |
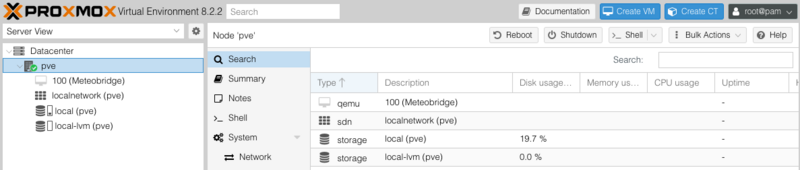
| − | * | + | * As a result a new VM named "Meteobridge" with an VM ID (here "100") is created. You may need to click onto the "pve" row to make the newly created VM visible.<BR>[[File:pm6.png|top|800px]] |
| − | + | ||
| − | * | + | Now it is time to attach the Meteobridge image file to the created VM. First step is to bring the Meteobridge Image onto your PROXMOX VE. We recommend to login via SSH on the PROXMOX VE as root user and then to download the Meteobridge raw image via wget on the command line: |
| − | * | + | <pre>wget -O meteobridge.img.gz https://admin.meteobridge.com/files/meteobridge-mbx86-v1.0-16G.img.gz</pre> |
| − | * | + | |
| − | + | Next the compressed image needs to be uncompressed: | |
| − | + | <pre>gunzip meteobridge.img.gz</pre> | |
| − | + | This will take some time and results into a 16GB image file. | |
| − | + | ||
| + | Next step is to make the disk image available for your Meteobridge VM. You do that by issuing the commnd: | ||
| + | <pre>qm disk import 100 meteobridge.img local-lvm -format raw</pre> | ||
| + | PROXMOX will create the new disk and it will be named "unused0:local-lvm:vm-100-disk-1" or alike. | ||
| + | |||
| + | Now you can leave the command line and continue setup with the Web GUI. | ||
| + | |||
| + | |||
| + | Next step is to setup the Meteobridge VM within PROXMOX without attaching a disk to i | ||
Revision as of 12:42, 20 May 2024
When there is a PROXMOX VE installed on your machine you can use the Meteoridbe VM raw image (used for KVM) to setup a Meteobridge VM within your PROXMOX VE.
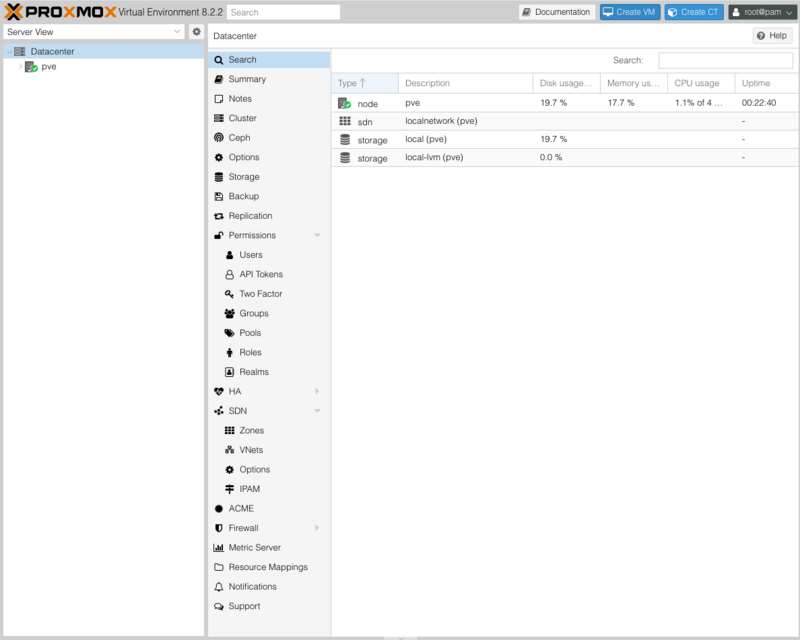
First setp is to create a new Meteobridge VM within your PROXMOX environment.
- Direct your browser to the PROXMOX Web GUI and press "Create VM" button.
- Insert "Meteobridge" as the name of the new VM and notice the VM ID (here "100") as you will need this later on to generate a disk image for this specific VM.
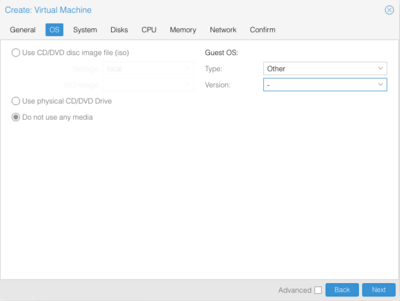
- Goto "OS" tab and select "Do not use any media" and "Guest OS" type as "Other".

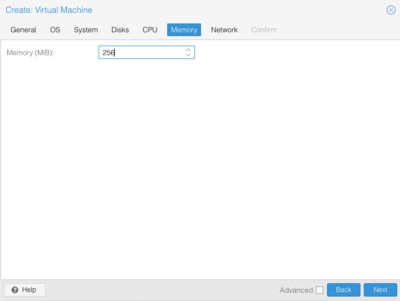
- Goto "Memory" tab and insert 256 MB as memory size. This is good enough for Meteobridge and it will not benefit from more.
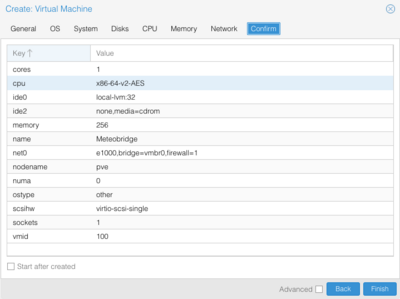
- Settings on the other tabs can stay at default values. Goto "Confirm" tab to check that all settings are like in the example below. Then press "Finish".
- As a result a new VM named "Meteobridge" with an VM ID (here "100") is created. You may need to click onto the "pve" row to make the newly created VM visible.


Now it is time to attach the Meteobridge image file to the created VM. First step is to bring the Meteobridge Image onto your PROXMOX VE. We recommend to login via SSH on the PROXMOX VE as root user and then to download the Meteobridge raw image via wget on the command line:
wget -O meteobridge.img.gz https://admin.meteobridge.com/files/meteobridge-mbx86-v1.0-16G.img.gz
Next the compressed image needs to be uncompressed:
gunzip meteobridge.img.gz
This will take some time and results into a 16GB image file.
Next step is to make the disk image available for your Meteobridge VM. You do that by issuing the commnd:
qm disk import 100 meteobridge.img local-lvm -format raw
PROXMOX will create the new disk and it will be named "unused0:local-lvm:vm-100-disk-1" or alike.
Now you can leave the command line and continue setup with the Web GUI.
Next step is to setup the Meteobridge VM within PROXMOX without attaching a disk to i